Showing posts with label PHYSICAL ASSESSMENT. Show all posts

Wednesday, April 6, 2011

FINDINGS IN PHYSICAL ASSESSMENT

Before doing anything else, perform a general survey. Try to observe your patient’s general appearance and behavior. As a nurse you must be familiar with a normal finding vs. an abnormal finding.

Assess for his vital signs – temperature, pulse (rate and rhythm), respirations (rate, pattern, depth). Remember, neonates and adults have different range of vital signs as to what is mentioned above. Check also your patient’s blood pressure.

When checking the nutritional status, take note of his height and weight. The ideal body weight of men is 106 lb for the first 5ft; add 6 lb per inch subsequently. In women, 100 lb for the first 5 ft, then add 5 lb per inch. Consider adding 10% for patients with larger frame but do the opposite for those with smaller frames.

If you are assessing the skin, check pallor on buccal mucosa or conjunctivae, cyanosis on nail beds or oral mucosa, jaundice on sclera. Check for signs of scars, bruises, and lesions. Check around the eyes and sacrum for edema, moisture, or hydration. It is also important to assess for the skin’s temperature, texture, and turgor (check over sternum for the elderly).

If you are looking at his hair, does he have hirsutism (excessive hair), alopecia (loss or thinning of hair)? Note down what you see.
http://farm1.static.flickr.com/134/393504897_59eaabbd62_m.jpg
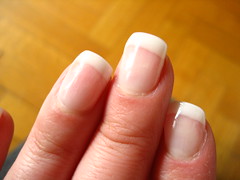
Look at his nails. Nails can indicate respiratory and nutritional status. Assess the nail’s colour, shape, and contour (normal angle of nail bed is ≤ 160°; a clubbing nail bed angle is ≥180° due to prolonged decreased oxygenation). Check also the nail’s texture and thickness, and capillary refill.

Patient’s head size, shape, and symmetry should be normal. Look for the temporal arteries then check his cranial nerve function.

Does his eye have ptosis (drooping of upper eyelid)? Assess for the colour of the sclera and conjunctivae. His pupils’ size, shape, equality, reactivity to light and accommodation (PERRLA) should be normal. Does he have photophobia, nystagmus, and strabismus? Check for the corneal reflex, visual fields, visual acuity. When performing an ophthalmoscope exam, check for any red reflex. Observe the fundus, optic disk for blind spot, and the macula.

When you are in the ear area do the Weber test and the Rinne test. Check also his tympanic membrane. Pull the pinna up and back to examine children’s and adults’ ears. Pull pinna down and back to examine infants’ and young children’s ears.

The nose and sinuses are assessed for the septum midline. Look on the nose’s alignment, colour, or any discharge. Palpate and percuss sinuses.
http://farm1.static.flickr.com/114/308412308_0fa3c40534_m.jpg
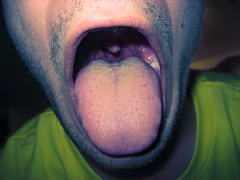
The mouth and pharynx are assessed particularly on the oral mucosa, teeth, tongue, hard and soft palate, uvula and its midline, tonsils, gag reflex, swallow, and taste.

The neck is assessed for its range of motion of cervical spine, nontender cervical lymph nodes which are normal in less than 1 cm round, soft, and mobile. It is also assessed for the treacheal position, thyroid gland, carotid arteries, and jugular veins.

The thorax and lungs area are checked for the alignment of spine, anteroposterior to transverse diameter of the thorax, respiratory excursion, respirations, tactile fremitus, and diaphragmatic excursion. Breath sounds is noted. Normal breath sounds can be checked via vesicular, bronchovesicular, and bronchial. Adventitious breath sounds occurs as rales, ronchi, wheezes, or pleural friction rub. The area of assessment is also tested for its vocal resonance. Bronchophony, egophony, and whispered pectoriloquy are tested out. The costovertebral angle is examined by percussing.

When checking for the heart sounds you must be familiar with the different kinds of abnormal sounds. Write down what you hear from the diaphragm.

Continue the assessment in the peripheral vascular system. Check for pulses from all the different areas: radial, ulnar, femoral, carotid, pedal, porterior tibial, popliteal, temporal, and apical. It is necessary to observe for any Homan’s sign which is a test for thrombophlebitis which shows pain in the calf when dorsiflexing the foot.

Breasts and axillae are assessed for its size, shape, and symmetry. Locate if there are palpable nodes which indicated abnormality. If the breasts are enlarged in males it is called gynecomastia.

When assessing the abdominal area, make sure your patient‘s knees are flexed to relax the abdominal muscles and provide comfort. Inspect and auscultate, then percuss and palpate. Check for its symmetry and contour. Look over the umbilical area and note everything you observe. Note down bowel sounds and it should be in 5 to 20 intervals of gurgles. The aortic, renal, iliac, and femoral arteries are auscultated with the bell of the stethoscope. Check for any peritoneal friction rubs, rebound tenderness, and abdominal reflexes.

The neurological system is assessed for deep tendon reflexes, cerebral function, mental status, cranial nerve function, motor function and sensory function.

The musculoskeletal system is assessed for the muscle tone and strength, and joint movements.

Provide privacy when assessing the genitalia and use firm but deliberate touch. Note down all the necessary observations.

Thursday, March 31, 2011

TECHNIQUES USED IN PHYSICAL ASSESSMENT

In general assessment, there are four ways to perform the physical assessment namely: inspection, palpation, percussion, and auscultation; however, in abdominal assessment the order is inspection, auscultation, percussion, and then palpation.

When performing visual examination (inspection) you start with an interaction to your client or patient. Provide and maintain good lighting in your assessment area. Determine the size, shape, colour, texture, symmetry, and position.

In touching (palpation) maintain warm hands and approach slowly and proceed systematically. Try to use your fingertips for fine touch when you’re looking for pulses or nodes. If you touch your patient for finding his temperature use you the dorsum (back) of your fingers. The palm or ulnar edge of your hand is for detecting vibrations. Start with light palpations before deep palpations. In bimanual palpations (both hands) this is preferably for deep palpation and to assess movable structure such as the kidney. Place you hand lightly on the skin surface then place active hand over sensing hand and apply pressure. When you are palpating for ballottement, push fluid-filled tissue toward palpating hand so object floats against fingertips. Palpation is also used for determining masses, pulsation, organ size, tenderness or pain, swelling, tissue fullness and elasticity, vibration, crepitus, temperature, texture, and moisture.

Percussion is the tapping on the body part to produce sound or vibration. The types of percussions are direct, indirect, and blunt. When doing a direct approach strike the body surface using one or two fingers. Indirect approach is by striking with finger or hand over body surface. While the blunt approach uses reflex hammer to check deep tendon reflexes. Use blunt percussion with fist to assess costovertebral angle tenderness. There are also some types of sounds produced by direct or indirect approach. The types of sounds produced are resonance, hyperresonance, tympany, dull, and flat. The resonance sound is a moderate to loud, low-pitched similar to a clear and hollow sound of moderate duration usually associated with air-filled tissue in the lungs. The hyperresonance is a loud, booming, low-pitched sound of longer duration found with overinflated air-filled tissue usually associated with pulmonary emphysema; however this is normal in children due to thin chest wall. The tympany sound is a loud, drumlike, high-pitched or musical sound of moderately long duration found with enclosed air-filled structures associated in the bowel. The dull sound is a soft, muffled, moderate to high-pitched sound of short duration found in dense fluid-filled tissue such as the liver. The flat sound is very soft, high-pitched sound duration found with very dense tissue like the bone and muscle. In percussion, it is important to determine the location, size, density of masses. You should consider the pain in area up to depth of 3-5 cm and always perform after inspection and palpation except for abdominal assessment.

http://farm4.static.flickr.com/3362/4627358644_b5022191e1_m.jpg
When listening to sounds (auscultation), some equipment is involved. Use the diaphragm to listen to high-pitched sounds like listening to the lung, bowel, or heart. Place firmly against skin surface to form tight seal. Use the bell to listen to soft, low-pitched sounds like heart murmurs. Place lightly on the skin surface. It is best to listen over bare skin and not through clothing. Moisten body hair to prevent crackling sounds.

Monday, March 28, 2011

WHAT YOU NEED IN PREPARATION FOR PHYSICAL ASSESSMENT

http://farm3.static.flickr.com/2513/3768688016_0be306355d_m.jpg
First things first, you have to gather all your equipments necessary for physical assessment. Here are some common items that you may need for physical assessment: ophthalmoscope, tuning fork, thermometer, penlight, gloves, tape measure or ruler, snellen eye chart, cotton swabs tongue depressor, safety pin, balance scale, nasal speculum, and vaginal speculum. When you have all your equipment go to your client or patient and provide him his privacy. How? Well, just bring him in a quiet and well-lit environment. Before you do anything else begin explaining your procedures to your client until he understands everything. If your guy is feeling stupor or very much unconscious, you don’t have to explain anything and begin a series of physical assessment.

Ask your guy to empty his bladder. This is to promote his comfort zone. Drape your client for privacy. As you begin your physical assessment be very sharp with your observations and try to compare what you see on his side of the body with the other side and compare with normal.

While you are doing your physical assessment skills, make use of teaching opportunities on dental care, eye exams, and self exam of breasts if the client is a she and for the testicles if your client is a he. Use appropriate piece of equipment for the entire physical assessment, then return your tools on the equipment tray.

PHYSICAL ASSESSMENT

http://farm6.static.flickr.com/5088/5265455547_f7e3a102e9_m.jpg
The purpose of physical assessment is to assess client’s health status. You may have to gain a keen eye similarly to that of a Sherlock Holmes so to speak. As you perform this series of task you may already have the built-in questions in your mind and you should know what you are doing. Remember, the variable that you are working with is a person and not a thing and that is why you have to be extra careful with whatever you are going to do. Another purpose when doing a physical assessment is to interpret the client’s physical data. It can be written in a narrative form, in a graph, in a chart, or in a checklist, or whatever that is used that suits you in your working area, however it must also be in accord with the policy of your institution. But why do you need a physical data? Well, that’s easy, it is for records. And this is to be interpreted very well and very professionally. This is where you set your big question: “is he sick or not sick?” and when you found out that he is sick the next purpose of physical assessment comes in – decide on the interventions basing from the data collected. As the nurse, you finally put things in place and plan your way ahead and your very main goal is to fix your subject regain back his health. Of course the rate of success won’t happen in a blink of an eye. Time will be your friend and both of you will work things out right.